Ebook editing can be overwhelming, since the quality of editing can make or break a novel, and no one can find everything. We recommend having a minimum of two professional editors reading your manuscript, as well as reading the manuscript yourself multiple times. But there are other techniques you can use to self-edit your book, and one of these is macros.
With macros, you can find -ly adverbs, repetitive words (like look, looked, see, saw), find missing quotes or spaces, and much more—the list is endless! It might take you ten or fifteen minutes to set up a macro for the first time, but each macro can do 10, 20, 30, 40 or even more different searches at the SAME TIME. That means you are not manually putting in those searches, and overall, macros will help you edit better and faster. (And macros will never drift off to sleep with searching or be distracted when someone comes into the room.)
So What are Macros?
Macros are actions that are now automated by code. If you find yourself doing a repeatable step on all your manuscripts, it’s a smart idea to make a macro to automate it. You don’t need to know code to make a macro, though—Microsoft Word allows you to record your actions, and it’ll create the code for you. With macros, you can
Macros can be used in several different Office programs, but we’ll be using it in Microsoft Word.
Creating a Macro
Create Through Recording
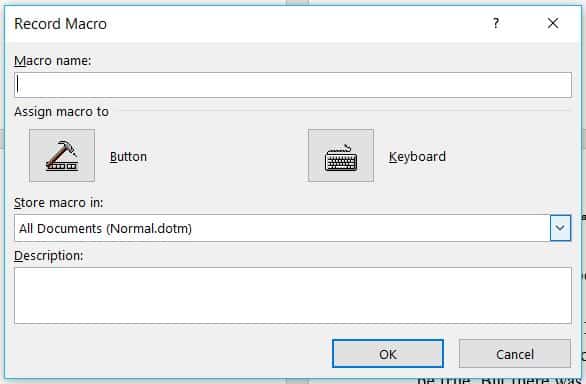
Go to the View tab on the ribbon of Word. On the right is the “Macros” button. Click the drop down and choose “Record Macro.” You’ll get the window below.

Give your macro a name. You can create a button or a keyboard shortcut for it, but you don’t have to. Push OK when ready.
Word is now recording; any action you make will be captured and translated into code. Once you’re done recording your action, go back up to the Macros dropdown and click “Stop Recording.”
Create through Code
To a create a macro through code (or to just paste in code that someone else has given you), click on the “Macros” button as explain above (or click the dropdown arrow and choose “View Macros”), type in your new Macros name, then click “Create.” This will open Microsoft Visual Basic, where you can put in your code.
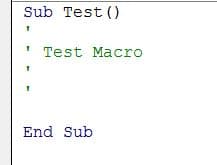
Word will create a skeletal structure for your macro where you’ll put in your code. It’ll look something like this:

All macros must start with “Sub” followed by the name of the macro and parentheses. They must end with “End Sub” so do not delete those. You’ll notice that the text “Test Macro” is green; this shows that it is a comment and not actually code. To create a comment, put an apostrophe before the text. Comments are so that people reading the code can be told what is going on, but the program ignores them when the code is run. Comments are not necessary, but can be helpful.
If you already have other macros created, you’ll notice that they also appear in this window. All the macros are actually stored in one file, so be aware of this when editing them.
For more detailed instructions on how to create a macro, check out Microsoft’s help guide here. For examples of macros that will help you with your ebook editing, read on!
Viewing and Editing Macros
To see all your macros, click on the “Macros” button, or click “View Macros.” You can create a macro from here, but you can also run a macro, delete a macro, or edit a macro.
Example Macros to Help with Ebook Editing
So let’s move to some specific example of how macros can help with your ebook editing. Here are two macros that I’ve found useful when editing. To use them yourself, just follow the “Create through Code” instructions above, and paste in the code for each macro. I am including the entire macro code, so if you’re pasting inside the “Sub” and “End Sub” text, do NOT include the “Sub [name]()” and “End Sub” text that shows in the macro below.
Macro Example One
This macro checks to see if there are missing double quotes (in other words, an opening quote without a closing quote, and vice versa). Because this is sometimes correct (in multiple paragraph dialog by one person), this macro only identifies the problem by underlining the text, rather than trying to fix it. After running the macro, search for the formatting underline (just click ctrl+h and the find and replace box with show up, with the underline formatting already in the find box). As you look at and fix each suspect paragraph (adding the missing quotation mark if it needs one), remove the underline and keep searching until all underlines are gone.
Sub DoubleQuotes()
‘
‘ DoubleQuotes Macro
‘ Version 07.12.12
‘ Check whether double quotes match up
For Each myPara In ActiveDocument.Paragraphs
myText = myPara.Range.Text
L = Len(myText)
L1 = Len(Replace(myText, Chr(34), “”))
Lopen = Len(Replace(myText, ChrW(8220), “”))
Lclose = Len(Replace(myText, ChrW(8221), “”))
If (L – L1) Mod 2 <> 0 Or Lopen <> Lclose Then
myPara.Range.Font.Underline = True
myCount = myCount + 1
StatusBar = “Found: ” & myCount
End If
Next
StatusBar = “”
If myCount = 0 Then
MsgBox (“All clear!”)
Else
MsgBox (“Number of suspect paragraphs: ” & Trim(myCount))
End If
Selection.HomeKey Unit:=wdStory
With Selection.Find
.ClearFormatting
.Replacement.ClearFormatting
.Text = “”
.Font.Underline = True
.Replacement.Text = “”
.MatchWildcards = False
.MatchWholeWord = False
.MatchSoundsLike = False
.Execute
End With
End Sub
Macro Example Two
This next macro searches for missing spaces in a variety of ways. It looks for a period immediately followed by a uppercase letter and puts in a space between them (I chose not to search for a period followed by a lowercase letter because that happens in URLs or email addresses and is correct), a comma immediately followed by a uppercase or lowercase letter, a closing quotation mark immediately followed by a uppercase or lowercase letter, and so on. This macro automatically fixes the missing spaces; it’s made of several find and replace patterns that use wildcards and regular expressions.
Sub MissingSpaces()
‘
‘ MissingSpaces Macro
‘ Puts in missing spaces
‘
Selection.Find.ClearFormatting
Selection.Find.Replacement.ClearFormatting
With Selection.Find
.Text = ChrW(8221) & “([A-Z])”
.Replacement.Text = ChrW(8221) & ” \1″
.Forward = True
.Wrap = wdFindContinue
.Format = False
.MatchCase = False
.MatchWholeWord = False
.MatchByte = False
.MatchAllWordForms = False
.MatchSoundsLike = False
.MatchFuzzy = False
.MatchWildcards = True
End With
Selection.Find.Execute Replace:=wdReplaceAll
Selection.Find.ClearFormatting
Selection.Find.Replacement.ClearFormatting
With Selection.Find
.Text = ChrW(8221) & “([a-z])”
.Replacement.Text = ChrW(8221) & ” \1″
.Forward = True
.Wrap = wdFindContinue
.Format = False
.MatchCase = False
.MatchWholeWord = False
.MatchByte = False
.MatchAllWordForms = False
.MatchSoundsLike = False
.MatchFuzzy = False
.MatchWildcards = True
End With
Selection.Find.Execute Replace:=wdReplaceAll
With Selection.Find
.Text = “.([A-Z])”
.Replacement.Text = “. \1”
.Forward = True
.Wrap = wdFindContinue
.Format = False
.MatchCase = False
.MatchWholeWord = False
.MatchByte = False
.MatchAllWordForms = False
.MatchSoundsLike = False
.MatchFuzzy = False
.MatchWildcards = True
End With
Selection.Find.Execute Replace:=wdReplaceAll
With Selection.Find
.Text = “,([A-Z])”
.Replacement.Text = “, \1”
.Forward = True
.Wrap = wdFindContinue
.Format = False
.MatchCase = False
.MatchWholeWord = False
.MatchByte = False
.MatchAllWordForms = False
.MatchSoundsLike = False
.MatchFuzzy = False
.MatchWildcards = True
End With
Selection.Find.Execute Replace:=wdReplaceAll
With Selection.Find
.Text = “,([a-z])”
.Replacement.Text = “, \1”
.Forward = True
.Wrap = wdFindContinue
.Format = False
.MatchCase = False
.MatchWholeWord = False
.MatchByte = False
.MatchAllWordForms = False
.MatchSoundsLike = False
.MatchFuzzy = False
.MatchWildcards = True
End With
Selection.Find.Execute Replace:=wdReplaceAll
Selection.Find.ClearFormatting
Selection.Find.Replacement.ClearFormatting
With Selection.Find
.Text = “.” & ChrW(8220)
.Replacement.Text = “. ” & ChrW(8220)
.Forward = True
.Wrap = wdFindContinue
.Format = False
.MatchCase = False
.MatchWholeWord = False
.MatchByte = False
.MatchAllWordForms = False
.MatchSoundsLike = False
.MatchFuzzy = False
.MatchWildcards = True
End With
Selection.Find.Execute Replace:=wdReplaceAll
Selection.Find.ClearFormatting
Selection.Find.Replacement.ClearFormatting
With Selection.Find
.Text = “,” & ChrW(8220)
.Replacement.Text = “, ” & ChrW(8220)
.Forward = True
.Wrap = wdFindContinue
.Format = False
.MatchCase = False
.MatchWholeWord = False
.MatchByte = False
.MatchAllWordForms = False
.MatchSoundsLike = False
.MatchFuzzy = False
.MatchWildcards = True
End With
Selection.Find.Execute Replace:=wdReplaceAll
End Sub
More Macros!
You can find a macro to search for -ly adverbs here (Karen Woodward) and over 500 more editing macros in a free book by Paul Beverley, a non-fiction editor from the UK.
What macros have you used to make ebook editing easier? Or what macro would you like someone to create for your manuscript? If you have any questions or comments, we’d love to hear them in the comments below!


Wow, great stuff here. I heard an editor mention using macros, but I didn’t know you could get them somewhere. I went to the site with the 500 macros and looked through the materials, but my head is spinning. I’m familiar with macros that I create myself by doing the series of keystrokes.