

If you’re like us and love to read, then click here to score tons of free and discounted ebooks.
Now that you’ve chosen your image for your cover, what do you do next?
In this tutorial, we will be using Photoshop to create the entire cover; that way, all the photo editing and the cover design will be done in the same program. You can also use a different photo editor, or you can edit the image in Photoshop and place it in InDesign to do the rest of the designing. Do whatever you feel most comfortable with.
Create your document
First, create your document by going to File –> New. In the dialogue box, choose “inches” for your dimensions and put in the size of your book.
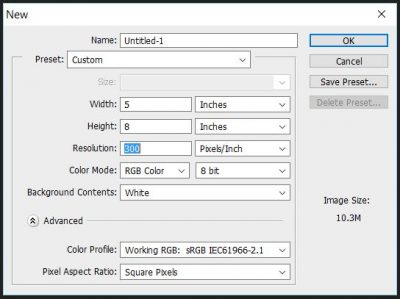
If you’ve already created a typeset book for print, this is easy—just use the same dimensions you used for your book. If you haven’t yet, or are planning on only selling your book as an ebook, here are three common book dimensions for fiction books: 5 x 8, 5.5 x 8.5, and 6 x 9. If your book is on the shorter size, you may want to go with the smaller dimensions, so your book looks bigger when printed, and vice versa. All the books in one series should have the same page dimensions.
If your cover design is for a print book, you’ll need to include the spine and the back cover in your file. You’ll also need a bleed—an area where the image can “bleed” past the trim lines in case the printer doesn’t cut the image exactly on the lines (because no printer is perfect). A bleed should be .125 inches all around your page. I do suggest adding these even if you’re not sure you want to produce a print book, because it’s much more difficult to add a spine, back cover, and bleed after the fact than to do it from the beginning.
To add the spine and back cover, double the width (to include the back cover) and add the width of the spine. You can get the width of the spine by multiplying the number of pages by .002252 (this is the regular paper width with KDP, but it will be different if you decide to use a heavier paper, so check with the printer you are using for the exact number). For the bleed I mentioned above, you’ll need to add an additional .25 inches to both your document’s width and height (.125 inches all around).
So, let’s say my book is 5 x 8 and is 250 pages long. My document width would be 5 (front cover) + 5 (back cover) + .563 (spine) + .25 (both bleeds), for a total of 10.813 inches. The height would be 8 (length) + .25 (both bleeds), for a total of 8.25. If you’re not sure how many pages your book has, you can guesstimate—the spine size can be changed later by changing the page dimensions. Generally, if you have to guess a width, it’s best to make the size slightly wider than you might need, because trimming is easier than adding width later.
Creating a bleed and a cover spread is much easier in InDesign (it’s part of the document setup), but we will stay in Photoshop for this tutorial to avoid throwing you into too many programs.
NOTE: Since most books will be released in print and ebook, you must have your resolution at 300 pixels. This will guarantee that the cover will look as great printed as it does on the ebook screen. For the ebook, you will actually size your cover down before uploading. For more details on that, see our tutorial about sizing finished images for ebook.
Place guides to mark your trim and bleed
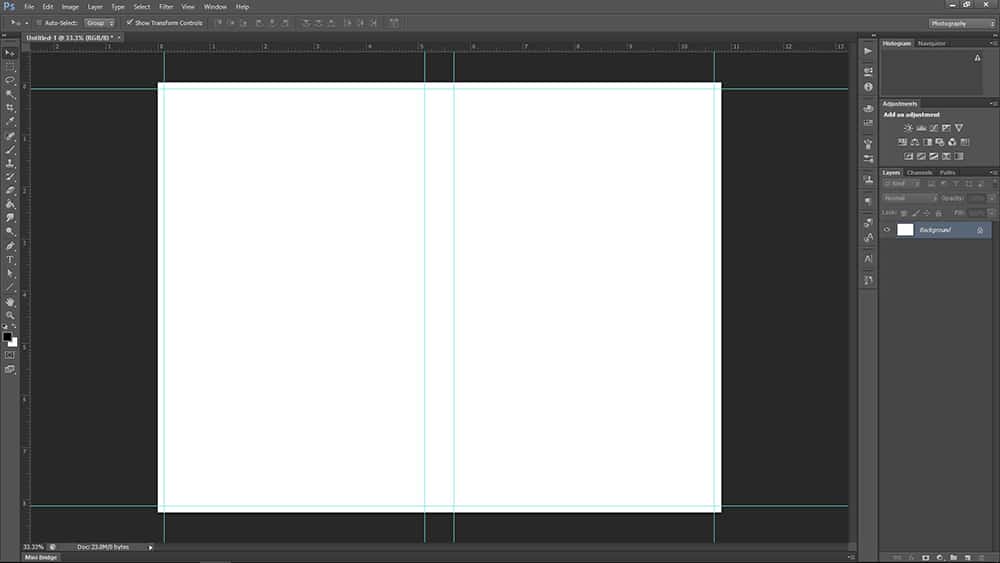
If you created a document with a bleed (which I suggest you do, so you don’t have to end up redoing your cover if you decide to print it), you’ll need to place guides so you’ll know where the cover will be trimmed after it is printed. In Photoshop go to View –> New Guide, and type .125 into the position. Create a vertical and a horizontal guide with this position. This will place your left and top guides right on the trim line.

The rest of the guides require a little bit of math! You want your right and bottom guides to be .125 away from the edges. For my document, that means I need a vertical guide at 10.688 (my total width of 10.813 – .125) and a horizontal guide at 8.125 inches (my total height of 8.25 – .125).
This process will place guides at .125 away from all your edges. Any element that is meant to extend to the edge of the page (bleed) needs to extend past these guides. But don’t put anything important there because that is where the printer will trim the cover.
You’ll also want guides to mark where your spine will be. These will be vertical guides. The first is the regular width of your cover + .125 (the left bleed), so my first guide would be at 5.125. The second guide will be placed at the width of your cover + .125 (the left bleed) + your spine width, so my guide is placed at 5.688.
Here’s what my document looks like so far!
Keep in mind that the printer may not fold the cover perfectly either, so you don’t want text too close to the spine edges. If it helps, you can put two more guides inside the spine area that are .062500 inches away from the spine edge.
If you don’t want to do all this math, check out our cover guide calculator here.
Place your image
To place your chosen image into your cover design, open the image in Photoshop and drag out the window so you can see both the cover and image file. Then (using the black selection tool) drag the image over to your cover file. Doing this will insert the photo at its actual size, so don’t drag out the corners to make it bigger; that will cause pixelation. Also, don’t use the Place option in the file menu because that will place your image as a smart object, which you don’t want. (In InDesign, you do use Place, so that may be confusing if you are familiar with InDesign.)
One pitfall new cover designers often fall into is only partially filling up the page with their image, then using a colored box around the image to fill up the rest. This more often than not just looks tacky and unprofessional.
Which of these books would you be more likely to pick up?


I would much prefer the first one! So make sure your image is big enough (at a good resolution) to fill up the page. Again, don’t stretch it out unless you only do an ebook. Otherwise on print, it will look pixelated.
Manipulate the Image
We can’t cover all the amazing things you can do with Photoshop in this one tutorial, but here are some things we’ve found the most helpful when designing covers. For all the images, feel free to right click on them to open a full size image in a new tab.
Here’s the image I’ll be manipulating for this tutorial:

Layers
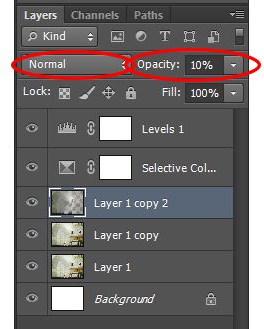
Photoshop is a great program because it has layers. All the tools I’m going to be showing you use different layers; that way, if you want to adjust something further, or turn it off completely, you can do so because each element and adjustment is on a different layer. If you’re putting two images together, they will be placed on separate layers when you drag each into the same file. You can adjust the opacity of a layer to make an image slightly see through, or you can change the “blending mode” to get different effects (the default is “Normal,” but you can get some interesting effects with changing it to “Overlay”).
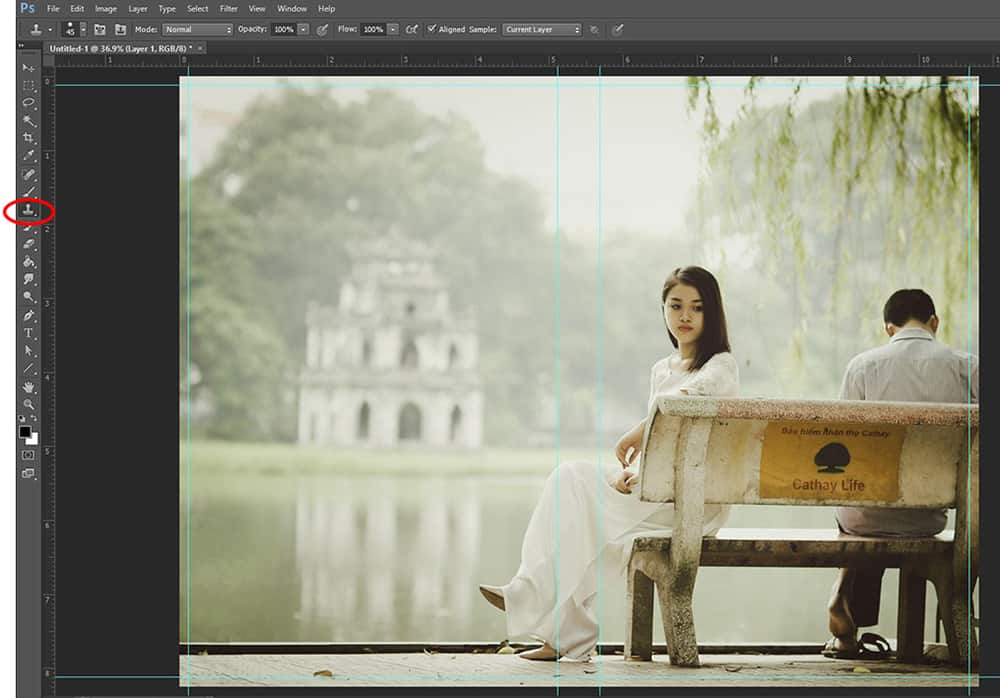
Clone Stamp Tool
I decided to use the entire image as a spread, so the left side will be the back cover. If your image isn’t long enough to do this, don’t worry. You can use another image for the back cover, or you can just use a solid color.
For my image, I don’t like the bike wheel showing up in the corner, so I used the clone tool to get rid of it. You could also get rid of the sign on the back of the bench. The tool works by holding down alt + click to “sample” the image, then releasing alt and just clicking to paste the sample over another part of the image. Using the clone tool takes some getting used to, so try not to get frustrated!
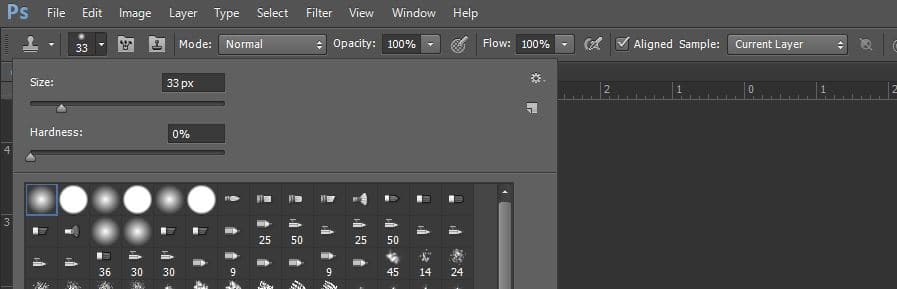
Important: If you choose a soft brush after clicking on the clone tool, it will make the new patch connect more seamlessly. You can also adjust the size of the tool. See image below where I’ve changed the size from 45 to 33. The first brush is the best option for beginners. (Basically, the clone stamp “brush” has the same options as the eraser tool.) After using the clone tool, you can use the healing brush tool (it looks like a band-aid) to smooth out any ragged edges, if needed.
The clone tool and the healing brush tool are also great to use if you’re trying to blend two images together. Another great tool is the patch tool (often grouped with the healing brush tool): simply select the area you want blended (you can select an area with the patch tool by drawing a shape, or select it with any other tool before switching to the patch tool), then click and drag until you’re hovering over the spot you want to blend with (usually, it’s right next to your original selection), then release and watch it blend!
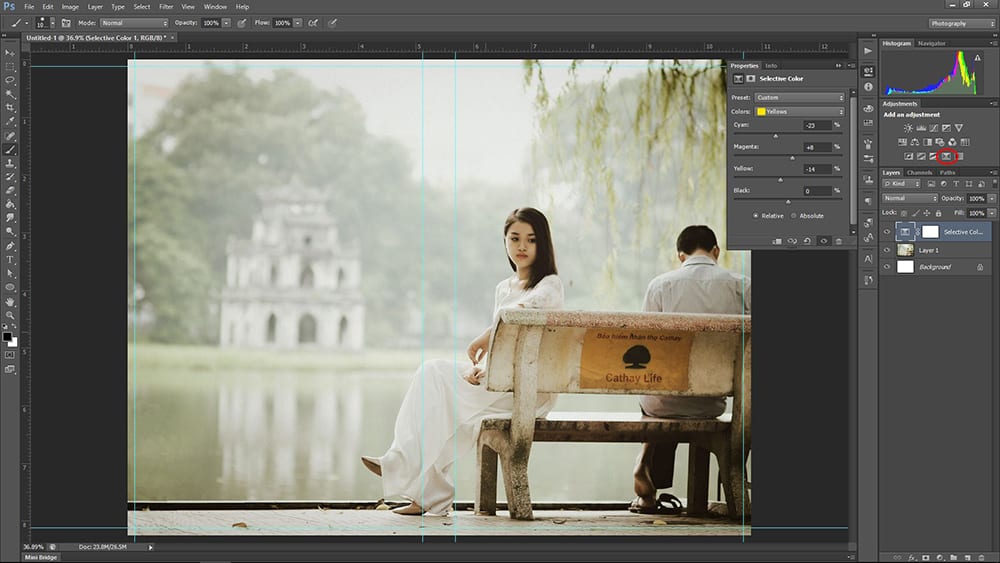
Selective Color
Selective color is an adjustment layer you can use to change individual colors in your image. In the drop down menu, choose the color you want to adjust (my screenshot shows yellow), then adjust the colors within that color.
You can apply the selective color to the entire layer by just clicking “Selective Color.” This is an easy way to correct the color on any image you have chosen. You can also have the selective color apply to just a selection in a layer, by selecting the part you want to adjust, then clicking the “Selective Color” icon. Or you create the adjustment layer, then, with the “white” adjustment layer selected, use the black paintbrush to “erase” (I know, it seems backwards) parts of the adjustment layer you don’t want to use.
I thought my image was just a bit too yellow, so I used the Selective Color tool to adjust the entire layer. If you can’t find the adjustments layer panel, try changing your Photoshop mode to”Photography” on the top right.
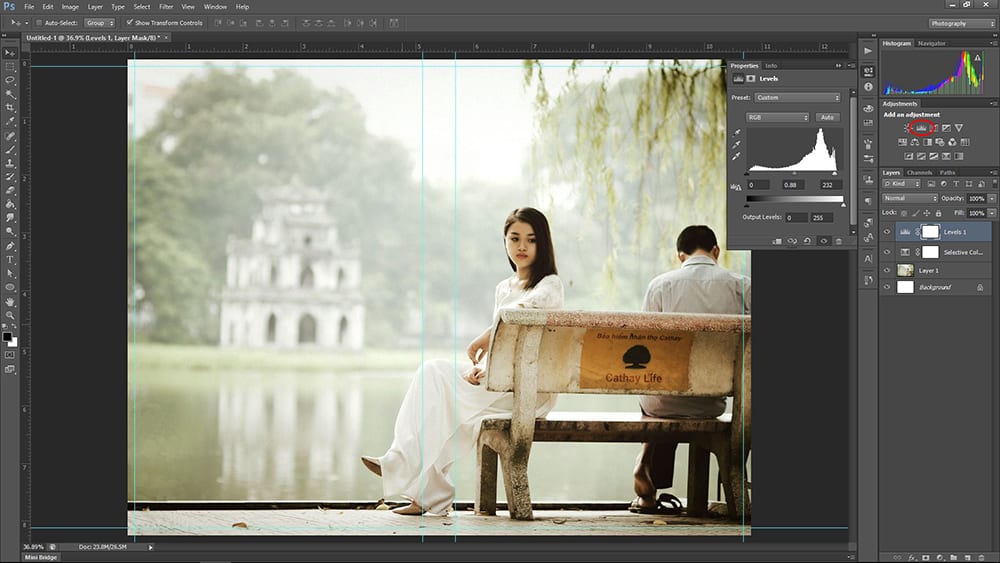
Levels
Adjusting the lighting levels can be done directly on the layer, but I suggest doing it as an adjustment layer (like the selective color we did above), so you can change it later if you need to. Levels allow you to change the lighting to make your image really pop with contrast. The slider on the left adjusts the darker lighting (slide it to the right to make the darks darker), the slider in the middle adjusts medium lighting (slide it to the left to make those levels lighter and the right to make the levels darker), and the slider on the right adjust the light lighting (slide it to the left to make the light levels even lighter).
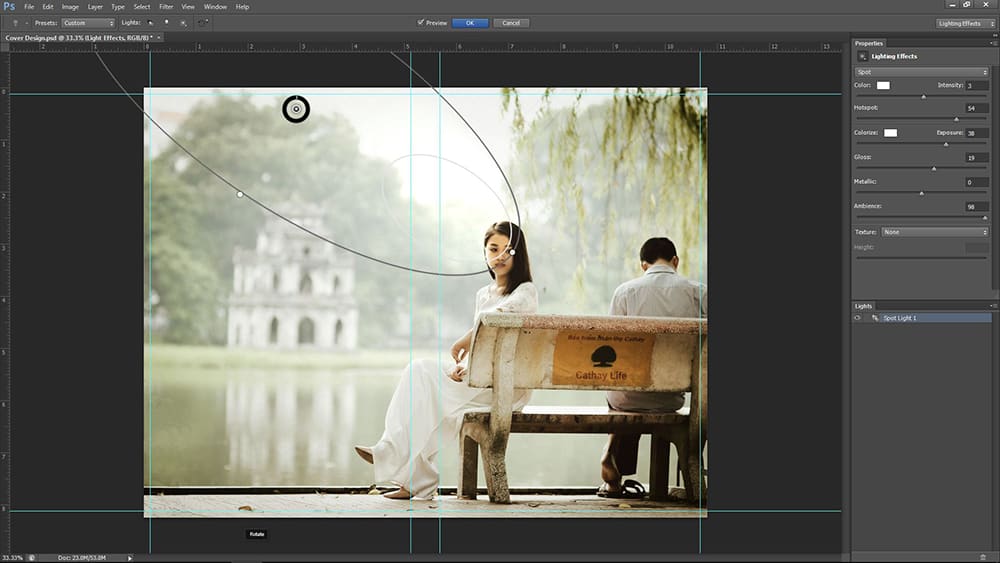
Lighting Effects
For lighting effects, go to Filter –> Render –> Lighting Effects. If the option is grayed out, make sure you click on your image layer—you can’t apply lighting effects to an adjustment layer. Before using lighting effect, I suggest creating a copy of your image layer (the shortcut is ctrl + j) in case you later decide you don’t like the lighting effect.
I like to use the Spot lighting effect. Feel free to experiment with the size of the highlight and the hot spot, the intensity, the ambient light, and so on.
More Photoshop Tricks for Cover Design
You can find more Photoshop tricks like creating light streams, sparkles or magic dust, and even fire. Even the tricks shown above can be used to create more dramatic effects than what we did. Some of these are made manually, and some are made using Photoshop “actions.” We highly recommend the affordable Photoshop actions from Envato Market for those of you who are a little more advanced.
Have fun experimenting! And next time, we’ll look at choosing and placing fonts on your cover image.
Have cover tips to share? Please let us know in the comments below.


Comments