You’ve heard of other authors doing it, but should you? In a word, yes. Every author should give the Microsoft Word Text-to-Speech feature a try as they fine-tune their manuscripts. When you read your book aloud, your ears will find many errors, repetitive words, and even plot flaws that your eyes (and the eyes of others) have often missed.
Note: Do not confuse the Text-to-Speech feature with the Read-Aloud feature. Text-to-Speech will read back a highlighted section, and you can make changes in the text without disrupting the reading. Read-Aloud will read one word at at time beginning where you put your cursor and does NOT allow a continuous reading while trying to edit because it will start again at the new place each time you move your cursor and attempt an edit.
Where to find the Microsoft Word Text-to-Speech feature
The “Speak” button, which uses the Microsoft Word Text-to-Speech feature, was introduced in Word 2010. So you’ll need Word 2010 or later to have Word read your book aloud.
First, you’ll need to add the Speak button to your Quick Access Toolbar.
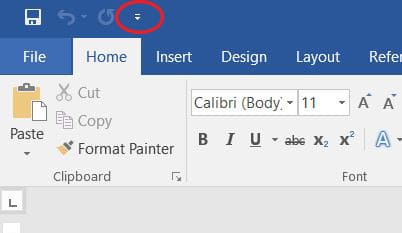
For Word versions 2010 through 2211, the Quick Access Toolbar is at the top left corner. At the top right of your document, click on the drop-down arrow.
Word 2212 changed things a bit. The Quick Access Toolbar is hidden by default, so you’ll need to first make it visible. Click the drop-down arrow on the bottom right side of the ribbon then click “Show Quick Access Toolbar”.
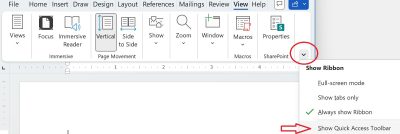
The Word 2212 Quick Access Toolbar will display below the ribbon, but can be moved to the top left corner by clicking “Show Above the Ribbon” in the “Customize Quick Access Toolbar” menu mentioned below. Now click the drop-down arrow on the Quick Access Toolbar.
From here, click the “More Commands” option.
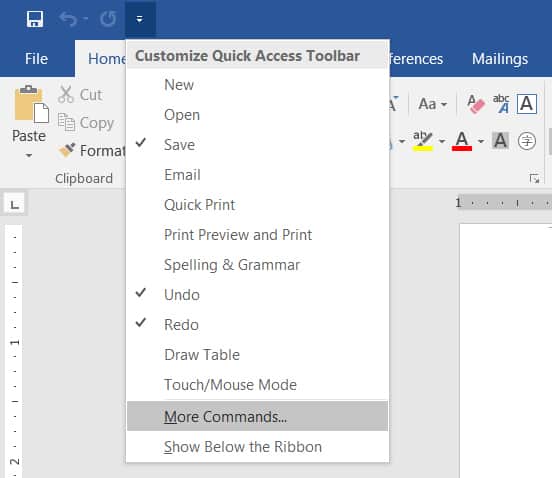
This will open up a window. From the drop-down, change it from “Popular Commands” to “All Commands.”
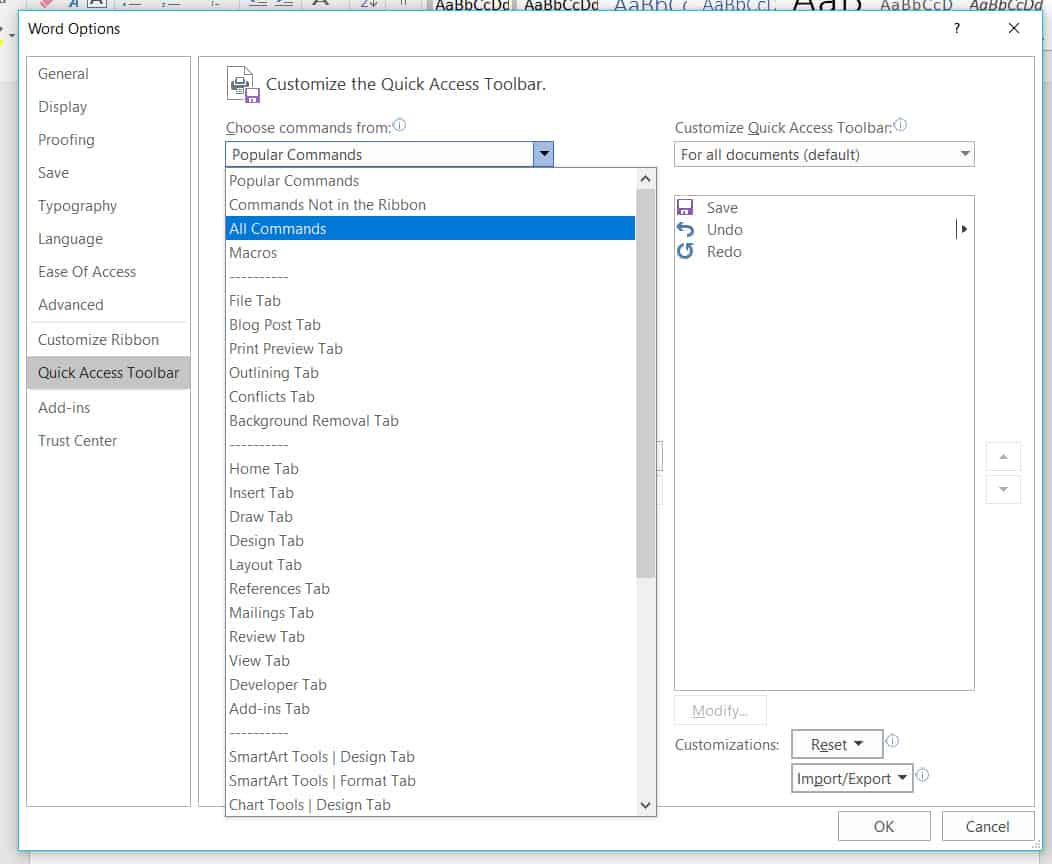
In the results below, scroll until you find “Speak,” click on it, then click “Add.”
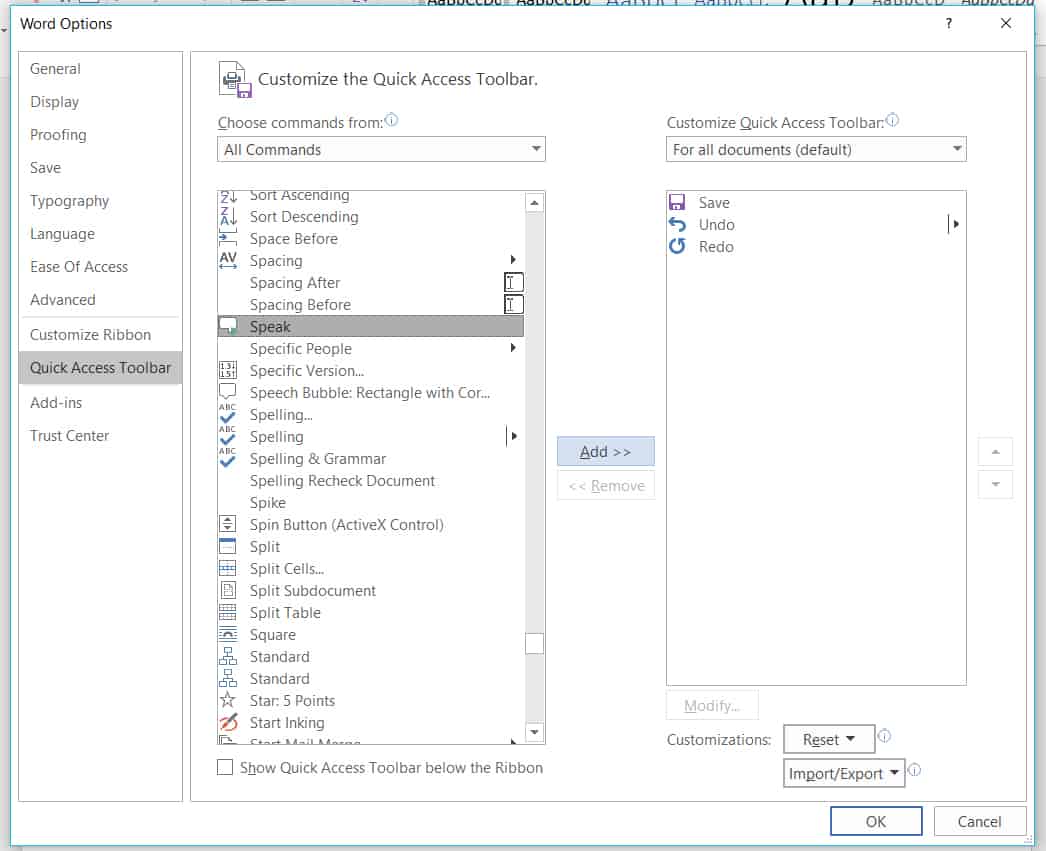
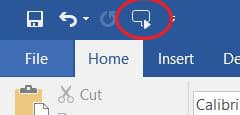
Click “OK.” The Speak bubble icon will now be in your Quick Access Toolbar, located at the top left of the window.
You can further customize the Microsoft Word Text-to-Speech feature; check out our blog post here for a detailed tutorial on how to change the speed and the voice that the Speak button uses.
Read your book aloud!
To activate text-to-speech, simply highlight the portion of your document that you want read aloud and click on the Speak icon that is now in your Quick Access Toolbar. If you need to change the speed of your Microsoft Word Text-to-Speech follow the directions here.
It’s that easy!
There, now you are all set up. Plug in your headphones, sit back, and let Word read your book aloud to you. You will likely be surprised at all the things you’ll find that you need to change or tweak. In fact, once you do a couple of books this way, we’re convinced you will never publish another book without first using Microsoft Word’s Text to Speech feature or another similar program.
Happy editing!
We hope this tip will help you in your publishing journey. We’d love to hear your experiences listening to your book in the comments below!




I was able to follow all of the instructions but am not clear on how to get this feature to read a book. Do I have to get the book downloaded into a certain format, like pdf, or into kindle? It does read the text in Word that is highlighted but needless to say, the book is not in Word. Thanking you in advance.
This method is only to read your book when it is in Word. What format is your book in?
I highlighted the portion of the document that I want read aloud and clicked on the Speak icon and is not reading the article, please help me out I have office 2010
Does it give you any errors, or does nothing happen? Make sure that your speaker is on and the sound turned up. If that doesn’t work, you could try repairing the program: https://support.microsoft.com/en-us/office/repair-an-office-application-7821d4b6-7c1d-4205-aa0e-a6b40c5bb88b